
Cupcakes!! Dairy, Soy, Gluten, Nut free!!

So my little one was tested through Enterolab to see if he's gluten intolerant. If he wasn't his IgA's would have been under 10, but they were 32!!
So he's been gluten free for a while, even since before the testing. He was having some issues and we suspected gluten on top of the already prevalent soy intolerance he has. Add that to the fact that he's dairy free just because we are in a dairy free house, and well... treats are pretty much off limits.
So I went to the store and found a literal wall of Red Mill mixes! So many of them are gluten, soy, and dairy free! We decided to try the chocolate cake mix because we had two parties to go to this weekend.
It's pretty simple to make, just make sure everything is at room temperature before starting. We used fresh lemon juice and a juice box of rice milk, plus Earth Balance soy free margarine to make the cupcakes. Once they cooled off, they were very soft, tasty, and easy to get out of the paper wrappers. If you ate one and didn't know it was gluten free, you would NOT be able to tell!
You can check out the line of Bob's Red Mill products here.
So once our cupcakes were cooked, we popped a few in the freezer to cool them fast while we made up some marshmallow frosting. Found the recipe through Pinterest and just HAD to try it.
The original recipe is from http://veronicahurly.blogspot.com/2010/09/marshmallow-frosting.html
Marshmallow Frosting:
4 large egg whites
1 Cup ordinary sugar (white or brown)
1 pinch of salt
1 tsp vanilla extract
Put the egg whites, salt, and sugar in a double boiler, or a small pot inside a large pot of boiling water. Wisk and stir until completely melted and hot. 5 minutes or so.
The pour this into a VERY clean mixer bowl, and wisk on high for 3 minutes. Add the vanilla about halfway through. If it has trouble fluffing up, then add 1/4 tsp. cream of tartar to help the peaks form.
Put into a piping bag, or a ziplock with the corner snipped, and pipe into cool cupcakes!
Make sure there is no water and no egg yolk in the mix... also I'm not sure how food coloring would affect this. I used organic sugar that was brownish when it melted but when whipped up, it turned bright white.
Enjoy!!


EASY Peanut Butter Cookie ~ Milk Free Recipes
{Originally posted September of 2011, updated April of 2012}
I have made these before. I've actually made them without the vanilla and they come out just fine. I have seen this recipe with 1/2 t. baking soda added to it, or a pinch of salt too. I suppose you can play around with it. Dairy, Soy (with the right PB), and Gluten free! I imagine they are corn free too, though I don't know that much about corn ingredients. I think I'm going to go make some with the extra crunchy Skippy natural that we bought by accident! Plus I happen to know from myfitnesspal.com that if you make 24 from this recipe they are only 80 calories each!! Yum yum!
 |
| Recipe Courtesy of Paula Deen (adapted for MFK.com) |
1 egg
1 cup sugar
1 cup peanut butter, creamy or crunchy
1 teaspoon vanilla extract
1 cup peanut butter, creamy or crunchy
1 teaspoon vanilla extract
Directions
Preheat the oven to 350 degrees. Grease a large baking sheet (or roll cookies in sugar before baking)
In a mixing bowl, combine the peanut butter, 1 cup of sugar, the egg, and vanilla, and stir well with a spoon. Roll the dough into balls the size of walnuts. Place the balls on the prepared baking sheet. With a fork, dipped in sugar to prevent sticking, press a crisscross design on each cookie. Bake for 12 minutes. Cool slightly before removing from pan.
French Toast Casserole ~ Milk Free Recipe
Finally getting to add this recipe way past when I originally planned. If you are a fan on the Milk Free Kids facebook page, then I'm sure you've seen the photos of this scrumptious French toast casserole.
It was crunchy on top, and ooey-gooey in the middle. My family described it as a cross between regular French toast and bread pudding. This is definitely a meal for a group. There were 8 of us here and we all had two servings and there was still 1/2 a pan left over.
It was relatively easy to make. I looked at a ton of recipes and then decided to just wing it. Almond milk is the milk replacement of choice because it's nice and thick. If you can't use almond milk, then a few cans of coconut milk (the thick kind from the international foods section) would be a great choice too.

Here's my recipe, you need to do this over night. Even start in the morning of the day before if you plan to dry out the bread.
Casserole:
1 loaf of milk free Texas Toast bread or an unsliced Italian loaf (all the Italian ones I've found are milk free)
8 eggs
Vanilla Almond Milk, or plain Almond Milk and Vanilla
1/4 C Cinnamon
1/4 C Dark Brown Sugar
Topping:
1/2 C Chopped Pecans
1/2 C Dark Brown Sugar
Cinnamon
Maple Syrup
4 tablespoons of milk free margarine, we used Earth Balance
Cube up the bread into 1" or so cubes. Let sit out for a few hours to dry if you'd like (if you are doing this the morning before). I do recommend this as it will help the bread absorb the mixture, but it's not detrimental. Lay it out in a 13x9x2" greased pan.
In a large bowl, scramble 8 eggs. Add 2 cups vanilla almond milk, (or plain almond milk and a tablespoon of vanilla), 1/4 cup cinnamon, and 1/4 cup dark brown sugar. (do this step and the next in the evening, before bed)
Pour egg mixture over bread cubes and make sure they are well coated. I recommend lifting up the top layers a little, pouring onto the bottom, replacing the top and pouring onto the top. Once the egg mixture is in, you don't want to try to move the bread or mix it, or else it will fall apart.
Cover and place in the fridge over night. I suppose 4 hours would be enough, but you can definitely let it soak for 12-16 hours.
Right before cooking, pre-heat oven to 350. Mix 1/2 cup chopped pecans, 1/2 cup or so of dark brown sugar, tablespoon of cinnamon, a dribble of real maple syrup, and 4-6 tablespoons of margarine. Use your fingers to really mash it together, then crumble it over the top of the casserole.
Bake for about 40 minutes (cover for first 20 minutes with tin foil). Make sure internal temp is 165 or greater, or check doneness by cutting into the center and looking at the bread.
Serve warm with maple syrup and bacon. Lots of bacon!!

Crock Pot Turkey Breast Roast
From a facebook fan...
3 lb turkey breast roast
1/2 cup dry white wine
some baby carrots
2 med onions, chopped
**add ins: bell peppers, celery, potatoes, sweet potatoes, asparagus, broccoli, zucchini**
3 garlic cloves
1/2 t onion powder
1/2 t garlic powder
1/2 t basil
1/2 t Italian seasoning
1/4 t dill weed
salt and pepper to taste
**(or whatever combo of seasoning you'd like)
Put wine, carrots, onions and garlic cloves in crock pot. (And whatever other veggies you're adding in. Just clean out your crisper :))
Mix all spices together, then rub the mixture all over the turkey.
Place turkey breast skin-side up over veggies.
Cook on low for 6-8 hours.
Check internal temp of bird after 4 hrs to make sure it's reached at least 140 degrees. (I have no idea why but that's what the package said.)
This was so moist and delicious. I served it with sauteed spinach and some pesto rolls that I had frozen. It was flippin' fabulous!
Blueberry Pie ~ Milk Free Recipes
So up here in the Northeast, we are about to get hit with a record breaking snow storm.
It's October 29th.
I thought I would do some baking before the power goes out... so I whipped up this blueberry pie. It was so simple, I almost feel lame posting it. It just came out so cute though. Too bad I don't eat pie.

Here it is:
1 Can of blueberry pie filling
1 Package of Pillbury pie crust
Pre-heat over to 425, Put one pie crust in the pie plate, pour in the blueberry, and top with a vented crust.
I used a little star cookie cutter to cut the top crust. As I laid the cut out stars over the star openings, they started to look like snow flakes. Very fitting.
Happy Pie Eating!!!


Pretzel Bites! ~ Milk Free Recipes
 So for the football game yesterday, we made pretzel bites. I was going to use regular frozen bread dough, but that contains soy, and my little guy can't have soy. Then I stumbled on this "Auntie Annie's At-Home Baking Kit" in the cake section of the grocery store. It's milk, soy, nut, and egg free!
They ended up much better than the game, thanks to Tom Brady... and the baby wouldn't touch them! Ah, well... the big kids and the grown-ups didn't have any trouble eating them as fast as I could bake them!
 Ingredients:
Pretzel Kit
Cooking Spray
4 C. Hot Water
Parchment Paper
~OR~
Fresh or frozen bread dough or frozen Rhodes rolls.
Kosher Salt
1/2 C. Regular White Sugar (and some vanilla sugar if you want, it's in the pudding section)
1 T. Cinnamon
Melted Margarine
1/4 C. Baking Soda
4 C. Hot Water
Cooking Spray
Parchment Paper
 |
| Lay on parchment after cut |
Directions:
Prepare dough according to package, or defrost 1 loaf of bread dough, or 5-6 rolls. Let rise.
Preheat oven to 425 degrees.
Punch down, roll dough into 1" tubes and then cut with a sharp non-serrated knife into 1" "bites". (Cut rolls into 4 quarters each)
Mix baking soda into hot water until dissolved. Line baking sheet with parchment paper (very important) and spray lightly with spray.
 |
| Dunk Quickly or you will get a blob of goo! |
Quickly dunk each "bite" into water mixture with a slotted spoon. Let drain a little, then lay 2" apart on baking sheet.
Pop into preheated oven for 5 minutes, rotate, then cook about 2-3 minutes more. DO NOT overcook!!
Melt margarine. Brush over hot pretzels. Sprinkle lightly with salt, or roll in cinnamon-sugar. Serve warm!
You could also drizzle with honey, dunk in mustard, make a powdered sugar glaze, use garlic butter (made with margarine), shake on some Italian spices before baking, dip in spice infused olive oil... etc. The options are endless!
 |
| Plain Pretzel Bites |
 |
| Cinnamon & Vanilla Sugar Bites! |
Shredded Sweet Pork ~ Milk Free Recipes
This recipe was posted on Facebook by my friend Lisa. I haven't tried it, but she just had it for dinner and said it was AWESOME!! Thanks Lisa!
Ingredients
Serve on rolls, as a stand alone meat with baked beans and cole slaw, or in a wrap with with rice, canned black beans, and Old el Paso enchilada sauce!
This recipe would probably also work with chicken. I've often swapped out chicken for the pork in my pulled pork recipes.
Ingredients
 |
- 1 - 10 lbs Pork Roast
- 2 - 15oz cans of tomato sauce
- 1 1/2 cups brown sugar
- 1 can of Dr. Pepper
- 1 clove of garlic, diced
- 1/4 cup cilantro, minced
Serve on rolls, as a stand alone meat with baked beans and cole slaw, or in a wrap with with rice, canned black beans, and Old el Paso enchilada sauce!
This recipe would probably also work with chicken. I've often swapped out chicken for the pork in my pulled pork recipes.
Citrus Chicken & Pasta ~ Milk Free Recipes!
 |
| Citrus Chicken & Pasta |
I'm sure I didn't invent this puppy, but I did make it up tonight in my kitchen.
As I most always do, I just eyeballed everything and used what I have. Check out the recipe and try to create your own!! You will EL OH VEE EEE it!!!!
Citrus Chicken & Pasta
2 boneless skinless chicken breasts (or 6 thin sliced breasts, 4 chicken tenders, or some boneless thighs)
1 box of pasta, I used mini Penne
1 cup of water (if needed)
1 box of Swanson Chicken Stock (or use broth)
1 cup of orange juice
Dairy Free Margarine
Spay oil for pan
Dried Parsley, Dried Basil, Lemon Pepper seasoning, and salt.
Here it goes:
Pour stock and orange juice in a medium pot, bring to a boil on high (don't add the water yet).
Spray your skillet with oil, or use a little margarine. Shake in some lemon pepper, place chicken in and shake more lemon pepper on top and a little basil and salt (I actually used "Citrus Basil" seasoning from The Pampered Chef). On medium heat cook your chicken until juices run clear or to 165 degrees in the center.
When your stock and OJ come to a boil, add pasta and a shake or two of salt and parsley if you want.
Cover and reduce heat and cook until al dante. If you don't have enough liquid for the pasta, add about a cup or so of water and bring it back up to a boil.
When the chicken is done, dice it up. Drain the pasta if you need to and combine it all in one pot. Add more parsley and a few tablespoons of margarine. I'm crazy about parsley. Like maybe borderline nut house crazy. I just love it!
You can also add peas or julienne carrots with the pasta. Or maybe toss in some steamed broccoli. It's really versitile, but tastes SOOOOOO good...
 |
| Citrus Chicken & Pasta |
Looking for recipes!
If you have some delicous milk free recipes, please email them to milkfreekids@gmail.com or post them to our Milk Free Kids Facebook wall and I will add them here!
Chicken Marsala - Milk Free Recipes
From a Facebook follower
4 boneless, skinless chx breast halves
¼ c flour
¼ t salt
¼ t pepper
2T olive oil
2 cloves garlic, finely chopped
¼ c parsley, chopped
2 shallots, chopped
1c sliced mushrooms
½ c dry Marsala wine
Pasta
1) Butterfly each chx breast so that they are ½ to ¼ inch thick. Mix flour, salt and pepper. Coat each breast with flour mixture; shake off excess.
2) Heat oil in 10” skillet over med heat. Cook garlic, shallots and parsley in oil for 5 min, stirring frequently.
3) Add chx to skillet. Cook, turning once, until brown. Add mushrooms and wine (I like to add capers at this point, too). Cook 8-10 min, turning once, until chx is no longer pink. Serve with pasta
Pumpkin Pancakes - Milk Free Recipes
From a Facebook Follower:
1 cup canned pumpkin
2 eggs
1/2 cup rice milk (could use oat milk)
1 cup oat flour
1cup brown rice flour
2 tsp baking powder (non aluminum)
1 tsp. salt
1 tsp. cinnamon
canola oil on the griddle.
Combine pumpkin, eggs and rice milk in a med size bowl In a seperate bowl, stir together the flours, baking powder, salt, cinnamon. Add dry ingredients to wet. and mix well. Cook on oiled griddle.
Banana nut muffins with German chocolate nana frosting - Milk Free Recipes
From a Facebook Follower:
1 ½ cup flour
1 ½ t baking powder
¼ t baking soda
Pinch of salt
2 egg whites
1 ¼ c mashed banana
¾ c sugar
3 T canola oil (or 1/3 c apple sauce)
1 t lemon zest
½ c chopped pecans
Preheat oven to 350°
Mix flour, baking powder, baking soda and salt together.
Mix egg whites, nana, sugar, oil and lemon zest together.
Mix wet with dry. Add nuts.
Fill paper muffin cups 2/3 full.
Bake for 20-25 minutes or until lightly browned.
Yields 12 muffins.
German Chocolate Nana Frosting
1/4 c butter-softened (Earth Balance dairy/soy free spread)
2 c confectioner’s sugar
½ nana, mashed
½ t vanilla extract
1 T unsweetened cocoa powder
½ c flaked coconut
½ c chopped pecans
Cream together butter and sugar until light and fluffy.
Add remaining ingredients. Mix well.
Refrigerate for 30 minutes before frosting.
Milk Free Recipes - Tomato Sauce & Canning - Part 1
We have a garden this year, and being new to gardening, didn't really know how to plan or plant or much of anything. (Ok, maybe my husband did, but I sure didn't) and we were gifted 5 baby tomato plants. We planted them, not thinking much of it, and they seemed to grow into tomato trees!! We hate tomatoes. A lot.
I decided to make and can (jar) up some sauce. Here's how to do it... it was my first time, so it was quite an adventure for me.
First you will need equipment. Bowls, colanders, large pots (think HUGE 20 quart pot and 6 quart pot), mason jars, thongs, jar lifters, lids (new lids each time, reusing rings and jars is ok), knife, water.

First things first, you will need about 20 or more pounds of tomatoes (I use a selection of Roma, Big Boy, and Mortgage Lifter) to make jarring your sauce worth while. Really. I thought 20 lbs would produce at least 16 jars of sauce... but nope... more on that in Part 2.
STEP ONE - PEELING TOMATOES:
Boil a large pot of water and prepare 2 large bowls of ICE COLD water (use ice if you need to).
Pull off all stems, and cut a small X in the bottom of all your tomatoes.
Place a few tomatoes into the boiling water for about 30 seconds or until the peels start to curl at the X.
Quickly remove each tomato and plunge into your cold water. You need to stop the cooking process.
Repeat for all tomatoes.
After all tomatoes are boiled and cooled, pull the skins off.

Taking the plunge!

Above: Boiling and Below: Cooling off


Peeled!

Oh look more peeled!
STEP TWO- SEEDING TOMATOES:
This is where it really gets slimy. Slice the tomatoes in half across their sides, not up and down.
Squeeze each tomato half over a bowl. You want all the seeds, juice, and slimy bits to come out. Use your fingers to dig them out. You want the meat of the fruit, not the liquid.
Cut out the stem area, and any icky spots and toss the good parts into another bowl.
You can even toss them into a strainer inside a bowl to get more liquid out. I ended up swapping for a strainer.
I then take the meats and run them through the blender to liquify. I'm a big baby an hate chunks of tomato in my sauce. If you don't mind the chunks, you can just hand smash them right into a pot.

Sliced Juicy Mortgage Lifters

Left side: Goo bowl Right side: Meat bowl

After the seeds are squished out.

I had over SIX QUARTS of liquid and unusable parts (left side) and about 6 quarts of meats

Blender and strainer!!
STEP THREE- PUT IT IN A POT:
Put your liquified or hand squished tomatoes in a big pot.
DO NOT ADD OIL IF JARRING
DO NOT ADD MEAT IF JARRING
DO NOT ADD CHEESE/BUTTER IF JARRING
You cannot add these things, they will spoil the sauce because of bacteria not being killed off by the canning process. Trust me, don't try it.
Add some yummies to the pot and simmer for about 4 hours on very low heat. Stir often.
As far as what to add is mostly up to your taste preferences. These are my additions, and in no real measurement, except the lemon juice. DO NOT SAUTE THE GARLIC OR ONIONS!! No oil, remember??!?!

I added: Oregano, Fresh Basil, Kosher Salt, 1/4 cup Lemon Juice (for acidity) 3 Cloves Garlic, Onion or Onion Powder, Brown Sugar, Pepper.

Oh yeah, and Tomato Paste helps too. Make sure it's only ingredient is tomatoes.

Simmer Simmer!
So that's how to make the sauce. If you added oil, meat, or dairy products to it, you can freeze it in bags or containers and it will defrost just nicely. If you don't have room in your freezer, canning would be a good option. Part 2 here!
Milk Free Recipes - Tomato Sauce & Canning Part 2
We have a garden this year, and being new to gardening, didn't really know how to plan or plant or much of anything. (Ok, maybe my husband did, but I sure didn't) and we were gifted 5 baby tomato plants. We planted them, not thinking much of it, and they seemed to grow into tomato trees!! We hate tomatoes. A lot.
I decided to make and can (jar) up some sauce. Here's how to do it... it was my first time, so it was quite an adventure for me.
First you will need equipment. Bowls, colanders, large pots (think HUGE 20 quart pot and 6 quart pot), mason jars, thongs, jar lifters, lids (new lids each time, reusing rings and jars is ok), knife, water.
First off, if you didn't read Part One (Step 1-3)... do it now. Okay?
Ok Good.
On to part 2....
STEP FOUR - PREPARE JARS AND LIDS:
Time to sterilize... run all your jars through the dishwasher. Use heated water and a hot dry.
Boil your lids and rings for a few minutes.
 Boiling some lids up
STEP FIVE - FILL JARS:
Fill your jars with a ladle and a jar funnel.
Make sure the rim of the jars stay sanitized and that you leave about 3/4" head space (I read on the web 1/4" and 1.5" so I just did 3/4" and was fine)
 Don't make a mess!
STEP SIX - PROCESS JARS:
Pull a lid out of the water. Use a lid puller (see photo below, these are sold at Walmart) and don't touch the underside of the lid.
Place the lid on top of a jar.
Grab a ring (HOT be careful) and tighten it on the jar. Pretty tight, by hand though.
Put lids on all the jars.


 Applying lid
THEN:
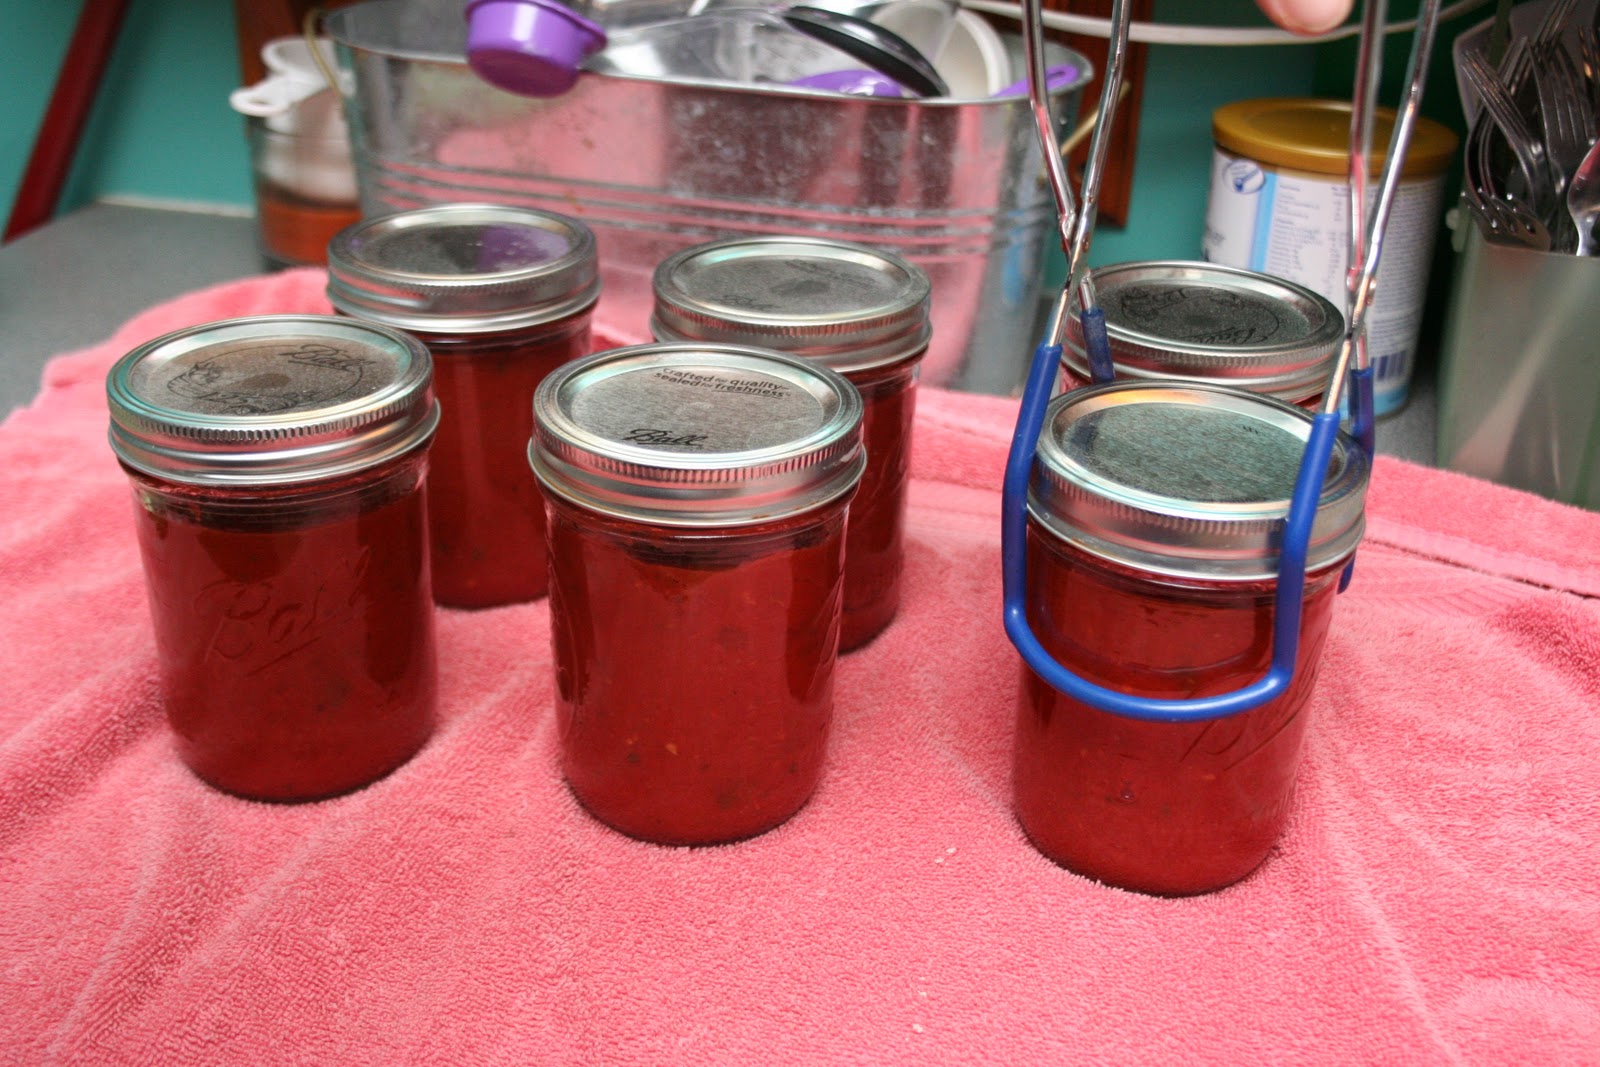
Use a jar lifter and place all the jars that will fit into the large pot you have boiling already. Make sure water is 1" or more above the tops.
Cover pot
Boil pints for 35 minutes and boil quarts for 40 minutes.
Remove from pot with lifters and place on a towel on your counter. Cover with a towel until they pop to keep out drafts. Do not touch the lids.
You will hear clicking or popping sounds. This is normal and means the jars are sealing.
Cool on counter over night and then store in a cool dark place.
If any tops did not suck down and are still able to be pushed in, they didn't seal. You can check them after an hour to see. If they didn't eat or freeze that jar. Don't try to reseal it.
Use within 8 months or so.
 Add them all slowly, or fill the rack and lower slowly
 Place them on a towel to cool.
Oh look... a free printable label Click on label for full size. Formatted to fit on 1/2 of an 8x10 sticker sheet.

Here's a site with lots of info if my How To was not clear.
First off, if you didn't read Part One (Step 1-3)... do it now. Okay?
Ok Good.
On to part 2....
STEP FOUR - PREPARE JARS AND LIDS:
Time to sterilize... run all your jars through the dishwasher. Use heated water and a hot dry.
Boil your lids and rings for a few minutes.

STEP FIVE - FILL JARS:
Fill your jars with a ladle and a jar funnel.
Make sure the rim of the jars stay sanitized and that you leave about 3/4" head space (I read on the web 1/4" and 1.5" so I just did 3/4" and was fine)

STEP SIX - PROCESS JARS:
Pull a lid out of the water. Use a lid puller (see photo below, these are sold at Walmart) and don't touch the underside of the lid.
Place the lid on top of a jar.
Grab a ring (HOT be careful) and tighten it on the jar. Pretty tight, by hand though.
Put lids on all the jars.

Lid Lifter (magnetic)


THEN:
Use a jar lifter and place all the jars that will fit into the large pot you have boiling already. Make sure water is 1" or more above the tops.
Cover pot
Boil pints for 35 minutes and boil quarts for 40 minutes.
Remove from pot with lifters and place on a towel on your counter. Cover with a towel until they pop to keep out drafts. Do not touch the lids.
You will hear clicking or popping sounds. This is normal and means the jars are sealing.
Cool on counter over night and then store in a cool dark place.
If any tops did not suck down and are still able to be pushed in, they didn't seal. You can check them after an hour to see. If they didn't eat or freeze that jar. Don't try to reseal it.
Use within 8 months or so.

Oh look... a free printable label Click on label for full size. Formatted to fit on 1/2 of an 8x10 sticker sheet.

Here's a site with lots of info if my How To was not clear.
Pineapple Wrapped in Bacon - Milk Free Recipes
So 5 years ago, my husband and I thought we were so very clever and made Pineapple Wrapped in Bacon for someone's party. It was a HUGE hit. We thought we made it up, but I need to make it again today for his work luau, and googled it out of curiosity. Well, apparently the whole world copied us!! Here's Rachel Ray's version:
Ingredients
1 pineapple, peeled, cored and cut into half-inch chunks, about 40 chunks
1 pound sliced lean bacon, about 20 slices
Preparation
Pre-heat the oven to 425°F.
Cut bacon strips in half making 2 equal size pieces, about 4 inches each. Wrap each half-strip of bacon around a pineapple chunk, pierce it with a toothpick and place on a baking sheet. Bake until the bacon is crispy, about 15-20 minutes.
I personally, pre-fry the bacon just a bit because I feel like it cooks better around the pineapple.
Peanut Butter Buddies (Cups) - Milk free recipes
I just wanted some peanut butter cups, so I did this:
1/2 cup creamy peanut butter
4 T milk free margarine
1/2 cup graham cracker crumbs
1 cup powdered sugar
1 1/2 cups milk free chocolate chips
2 tablespoons shortening
Melt margarine in the microwave, mix with peanut butter, sugar, and crumbs. Form into 24 teaspoon sized balls.
Line mini-cupcake tins with 24 paper liners.
Melt chocolate and shortening in a bowl in 30 second intervals stirring well between each run. When creamy, spoon 1 teaspoon of chocolate into cups. Place in freezer for about 5 minutes to set.
Place peanut butter balls in cups, flatten if needed. Spoon 1 teaspoon of chocolate over each cup.
Place in freezer for a few minutes until set.
Yum!
BBQ Shredded Chicken or Pork - Milk free recipes
Ingredients:
One Batch of my BBQ Sauce
8 boneless chicken thighs
OR 4 boneless chicken breasts
OR 3 lbs of pork
Place choice of meat in slow cooker. Add prepared BBQ Sauce. Cover and cook on low for 8 hours or high for 4 hours. DO NOT REMOVE LID.
When cooked, shred meat with 2 forks. Serve on buns!
One Batch of my BBQ Sauce
8 boneless chicken thighs
OR 4 boneless chicken breasts
OR 3 lbs of pork
Place choice of meat in slow cooker. Add prepared BBQ Sauce. Cover and cook on low for 8 hours or high for 4 hours. DO NOT REMOVE LID.
When cooked, shred meat with 2 forks. Serve on buns!
Barbecue Sauce BBQ!! - Milk Free Recipes
Ingredients:
1 1/2 cups ketchup
1/2 cup packed brown sugar
1/2 cup finely chopped onion or 1 tablespoon onion powder
1/3 cup apple cider vinegar
1/4 cup Worcestershire sauce
2 teaspoons chili powder
1 teaspoon lemon juice
1 tsp mustard powder or yellow mustard
1 clove garlic, pressed or 1 teaspoon garlic powder
Salt and Pepper to taste
OPTIONAL MIX-INS:
Use one or more in any flavor combination to play up your BBQ sauce!!
1/4 cup maple syrup
1 tablespoon molasses
1/2 cup honey with or without a 1/3 cup of white wine (increase ketchup to 2 cups)
1/4 cup honey, 1/8 cup dijon mustard
1/4 teaspoon cayenne pepper
Parsley
Hot Sauce
Directions:
Combine all ingredients in Small Saucepan. Bring to a boil over medium-high heat. Reduce heat to medium-low; cook 10 minutes or longer, stirring occasionally, until desired thickness. Use on meat or store in a bottle in refrigerator up to 1 month.
Apple Pie Too - Milk Free Recipes
Well, fall is just around the corner, and with the hot summer we had, the apples are already ready! So here's an apple pie recipe to get your tasted buds sweating... my pie is in the oven now... oh wait.. nope here it is:

Ingredients
Crust:
1 box Pillsbury® refrigerated pie crusts, softened as directed on box
Filling:
6 cups thinly sliced, peeled apples
3/4 cup sugar
2 tablespoons all-purpose flour
3/4 teaspoon ground cinnamon
1/4 teaspoon salt
1/8 teaspoon ground nutmeg
1 tablespoon lemon juice
Directions
1.Heat oven to 425 degrees F. Place 1 pie crust in ungreased 9-inch glass pie plate. Press firmly against side and bottom.
2.In large bowl, gently mix filling ingredients; spoon into crust-lined pie plate. Top with second crust. Wrap excess top crust under bottom crust edge, pressing edges together to seal; flute. Cut slits or shapes in several places in top crust.
3.Bake 40 to 45 minutes or until apples are tender and crust is golden brown. Cover edge of crust with 2- to 3-inch wide strips of foil after first 15 to 20 minutes of baking to prevent excessive browning. Cool on cooling rack at least 2 hours before serving.
